Version 0.5.5

Updated 8/22/2017
MazeEngineers Treadmill
Single Lane
Three Lane
Six Lane
1. General Safety Summary
- Read the following safety precautions carefully to avoid personal injury and to prevent damage to the product or any product connected to the product.
- To avoid possible hazards, be sure to use this product as specified.
- Do not remove or repair this product without the authorization of our company. Use a power cord that is certified in USA.
- Before using the instrument, please connect the instrument correctly with reference to this manual to ensure proper wiring when the power is turned off.
- Do not use this product when the cover is open.
- If you suspect that the product is damaged, please contact our technical staff for maintenance. Don’t open and repair this product.
- Do not use in humid environments. Please be properly ventilated.
2. Product Key Features
- High Quality LCD Monitor
The monitor has advantages of a clear display and high contrast. The user interface is very friendly and operations are simple and intuitive.
Capacitive touch screen – achieve 99% accuracy, with less than 3ms response speed, smooth user experience.
- Servo motor
The product uses a high end servo motor as a main component with control accuracy of 0.0001M and speed range 0-100 m/min.
- Acceleration
The product can be set to run acceleration, to achieve uniform acceleration or uniform deceleration mode of operation.
- Multi-step speed control
The product allows multi-steps speed control. Each step can be set to di erent parameters (time, speed, acceleration).
- Record persistency
The product comes with power-down saving function – save up to 200 experiment results.
- Fetch data
With the company’s software, the experimental data can be uploaded into the computer (see separate document “Maze Engineers Treadmill Software User Manual.pdf” for more details).
- Data Browse
The browse function allows user to choose previous experiment results, display them.
- Printing
The product comes with needle printer (never fade), the experimental data can be printed to form a paper experiment report.
- Electric Stimulus
The product comes with electric stimulus grid with the intensity range of 0-5mA. It can be turned on/o manually. In case of animal fatigue, it is turned o automatically. The stimulus can e ectively force animal to run.
- Individual Lane Counting
Each lane has a separate counting. Each lane has a separate button in the front of the treadmill track. Start the experiment, put the animal in its lane and then press the button. Once the lane button is pressed, the lane counting starts. After all lanes start, the experimental total time counting starts. When a lane reaches the total time, the system beeps. When the last started lane reaches the total time, the treadmill stops running.
The result output include:
- Lane Num
- Distance in meter
- Duration
- Shock count
- State
- Animal Fatigue Alert
- Shock number mode: There is a label Warn on the screen. When Warn=OFF, the function is off. Warn values range from 2 to 500. For example, when Warn=30 and shock count reaches 30, the electric stimulus in the lane is turned off.
- Shock duration mode: There is a label Shock on the screen. When Shock=OFF, the function is off. Shock values range from 2 to 25. For example, when shock=10 and shock continues for 10 seconds, the electric stimulus in the lane is turned off.
When one of the above two condition occurs, the animal is considered fatigue, the lane animal state on the left screen becomes “Alert”.
- Sound and light stimulus
The system comes with 120db (decibel) sound stimulus and 10000Lux, and can be independently controlled.
- Experiment Environment
The instrument comes with high precision temperature and humidity sensor, real-time monitoring of laboratory temperature and humidity environment and save the record of the parameters along with the experiment results.
3. Usage Instructions
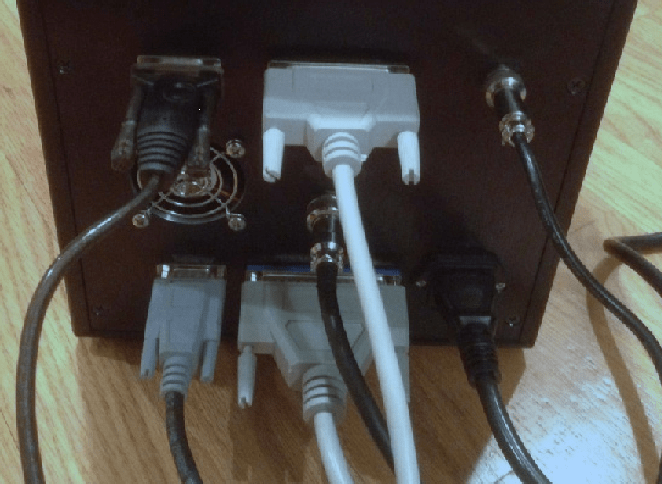
- Upper left: USB To RS232 cable connecting treadmill and PC
- Upper middle: 25-wire connection to the printer interface
- Upper right: 5V printer power cord
- Middle row: Four core interface connecting to Treadmill (Motor)
- Lower left: Connect to Treadmill
- Lower middle: Connect to Treadmill (electric stimulus)
- Lower right: power cord (110V-60HZ)
4. Experiment
- Power On
- When Power is turned on, the screen shows two labels Delete and Enter<<<<<<

- If Delete! is pressed, the previous experiment result data is deleted and the next experiment group (experiment ID) is reset to 1.
- Click Enter and the experiment window appears as below:

5. Experiment Setup
- After power on, the experiment screen appears. The data on the screen is the last experiment setting and result.
- System Time Setting
Press on the system time display on the right up corner. Adjust time stamp using + – key and save the setting.
- Parameters
The top row shows the following information:
- Experiment group (Experiment ID)
- Start time
- Number (Lane number)
- Temperature
- Humidity
Note that the number should be set to the number of lanes. For example, if two lanes are used, the number should be set to 2. The system is expecting both two lanes to start (both buttons in the front of the track pressed) in order to start counting total time.
- Speed setup
The treadmill support constant speed, constant acceleration (deceleration). The system default to the last setting.
If you choose to change it, click Del key and all previous speed steps are deleted.
Then set time period, acceleration, speed. Click on Add Step to add the speed step to the configuration on the Section area.
For example, you want to have an experiment run of total 30 minutes, speed 10 meter/min, acceleration 100 meter/min2. Follow the following steps:
- set TotalTime to 30 minutes.
- set Section time to 30 minutes
- set speed to 10 meter/min
- set speed to 100 meter/min2
- Press Add Step
- Your setup is shown in the right Section of the left panel. Click Start to run treadmill.
- Press the button in the front of the each lane, the lane count starts.
- You can press Stop to stop treadmill running or wait until the total time reaches.
- Multiple step speed setup
For example, you want to have an experiment run of total 30 minutes with two speed steps:
Step 1: from 0-5 minutes, speed 10 meter/min, acceleration 100 meter/min2
Step 2: from 6-30 minutes, speed 20 meter/min, acceleration 95 meter/min2
Follow the following steps:
- Press Del to delete previous speed step(s).
- set TotalTime to 30 minutes.
- set Section time to 5 minutes.
- set speed to 10 meter/min.
- set speed to 100 meter/min2.
- Press Add Step.
- Your setup is shown in the right Section of the left panel with two lines:

Your setup is ready now.
- Click Start to run treadmill.
- Press the button in the front of the each lane, the lane count starts.
- You can press Stop to stop treadmill running or wait until the total time reaches.
Note that the max number of speed steps is 8.
- Real-time speed adjustment
After experiment run starts, speed can be adjusted using +- buttons.
- Pause
After experiment run, click label Pause to pause treadmill in case of special situation. After click on Pause, the label changes to Resume. Click on Resume will automatically resume treadmill running.
- Electric Stimulus
Click the label Electric, electric shock turns on for all lanes. Click Electric again turns off shock.
- Sound Stimulus
Press on the Sound, the equipment plays sound. Press Sound again turns off sound.
- Light Stimulus
Click on the Light, the equipment turns on light. Click Light again turns off light.
- Stop Experiment
Click the Stop, the experiment stops by user. By default, the treadmill runs till the end of the experiment total time.
- Real-time speed
The real-time speed is shown on the left lower panel of the screen.
- System state and operation reminder
The current system state is shown on the lower screen. The states include: Standby, Set, Running, Pause, View and Set-Time.
Below are the available operations on each state:
- Standby: Start, View, Print, SetSysTime, ParameterSet
- Set: Start, +- parameters
- Running: Stop, Pause, Electric, Light, Sound, +-SetSpeed
- Pause: Stop, Resume
- Browse: +-ChangeGroup, Print
- SetTime: change timestamp
- Browse
In the state of Standby, click on View to be in the view state. Click Print, to print the experiment result. If connected to PC, the result data can be uploaded to PC.
- Adjust Slope
The slope of the treadmill can be adjusted by using the handle on the right side. Use the angel meter provided to get to the desired slope.
6. Training
Necessary training may be required for animal to be familiar with the treadmill. The training method can be as follows:
- Power on treadmill, set speed 5m/min, 10m/min, 15m/min respectively, and trial time 3-5 minutes. Electric stimulus is set to 1.0-2.5mA for Rats and 0.8-1.5mA for mice. Then start experiment and turn on electric stimulus.
- After step 1 training, put animal in the lane and press the button of each lane to start counting
- Observe the movement of experimental animals, according to the need for repeated training or speed training.
7. Precautions for experiment
- In case the animals stay in the electrical stimulation area and does not exercise, it may be the animal in which the electric rod with the same polarity stimulus.
Through the sound stimulation or artificial drive, the animal can be forced to move to achieve the stimulus effect.
- In the course of the experiment, if it occurs that the animal tail is tangled in the individual animals exercise capacity, or the spacing between the cover and the treadmill belt clip, the experimenter can terminate the running of the treadmill by pausing or stopping the experiment.
- Regular cleaning of equipment, including belts and electrical stimulation areas, is needed to achieve the best experimental results.
Warning: Please power off before cleaning the equipment.
- Due to the mechanical structure and motor component, noise may appear during operation, which is a normal noise. The noise can be eliminated by maintenance, or contact the manufacturer.
- We recommend, after running 200 hours, to have a maintenance – cleaning the transmission parts plus lubricating oil.
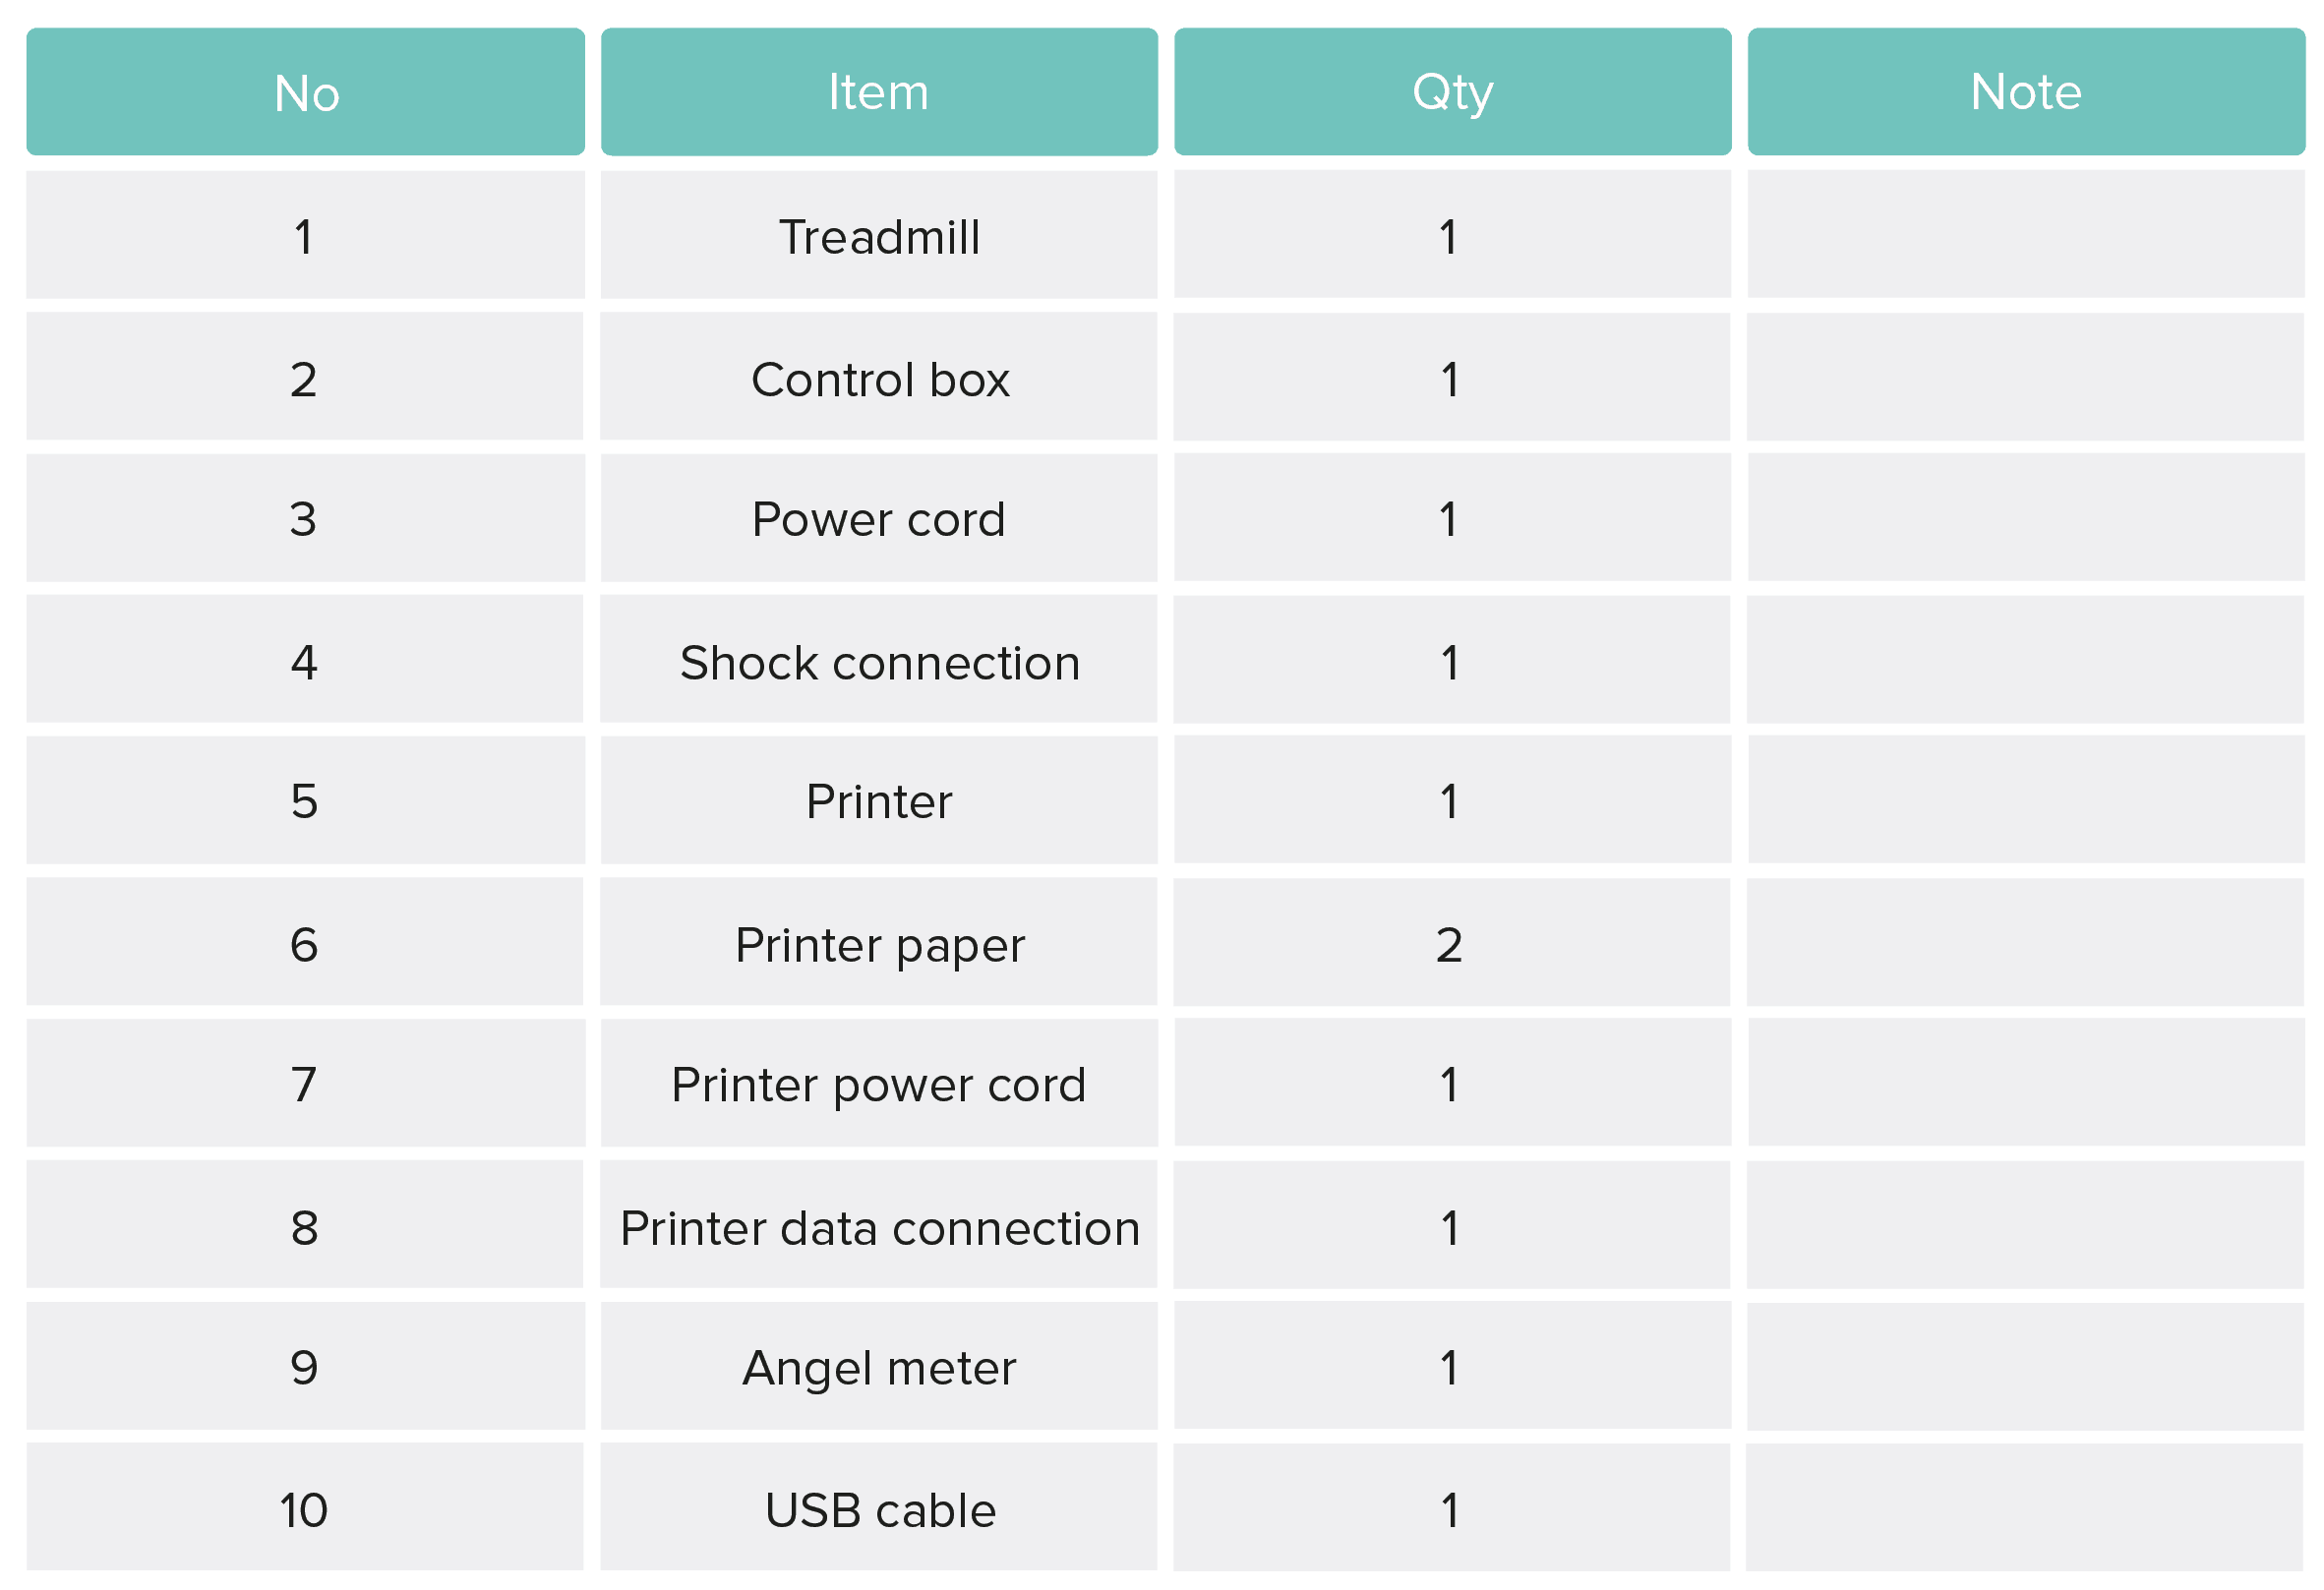
8. Shipping List